
One of these days I’ll blog about moles and all the problems I’ve had with them over the years, but for now, I’ll tell you about my own tunnels. While a mole’s tunnels make my yard and garden paths look a mess, my tunnels give my garden a look of sophistication. A mole’s tunnels are built in his search for tasty earthworms, my tunnels are built in my search for tasty veggies!

Tons of tunnels!
There are lots of different kinds or tunnels you can build in three basic categories:
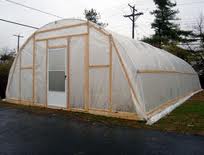
- High Tunnels–Very large structures you can walk in to, usually permanent, but can be somewhat mobile. Made of top-rail chain link fencing posts bent to an arch and then covered in greenhouse film. These tunnels are cheaper to build than a permanent greenhouse, but need to be re-covered every few years as the plastic film degrades.
- Medium Tunnels–4 foot tall tunnels made of EMT or PVC conduit and covered in greenhouse film or Agribond (spunbond polypropylene).
- Low Tunnels–1-2 foot tall tunnels coveredin Agribond and supported with wire frames and twine.
All of the tunnels do an awesome job of extending your seasons, protecting your plants from wind, frost, insects, and hungry mammals. each one has very specific benefits and I’ll do my best to explain what I have learned over the years.
One of these days….one of these days!
One of these days I plan to build my own high tunnel in my driveway, but the expense is just too much right now and I have not outgrown my two small greenhouses yet.

The “Salad Chute”
The simplest and least expensive of the tunnels is the amazing little “low tunnel”. These tunnels are great for growing salad and cole crops as well as other lower growing vegetables. You can build one of these tunnels for your garden for about $20. I have been using these tunnels to extend my growing season in the spring and fall for many years and have had amazing results. I use Agribiond 19 in the 83″ width for covering these tunnels and use “hoop loops” for the supports. 3 hoops and some twine will support the cover over an 8-12 foot long bed. This covering is absolutely amazing as it protects your plants from frost and keeps them from freezing as it holds in heat. Last weekend, the temperature dropped to 24 degrees, but the wet soil and plants under the Agribond 19 was still unfrozen and frost free. It also does an awesome job of protecting young seedlings from harsh winds. Make sure your fabric is anchored securely with heavy weights or heavy duty garden pins or staples.
Keep the covering of Agribond on these tunnels all the time. This material allows 85% light transmission and you can water right through it. Remove it only to weed, plant, or harvest. If your plants grow tall enough to touch it, it’s ok, they won’t be damaged.

Snap Clamps Hold Down Agribond 15

Medium tunnel protecting my kale from cabbage loopers
Medium sized tunnels can be used for two very different purposes. The first purpose is insect control of vegetables that do not need pollinators or for isolating plants to avoid cross-pollination for seed saving. Formed from 1/2 inch PVC or EMT conduit and either clamped to the sides of your beds or stuck into the ground, these tunnels are a bit more expensive to build at a cost of $50 or so. The above bed is planted with kale and kohlrabi and covered in the very light Agribond 15 which allows 90% light transmission. My goal is to keep out the cabbage loopers and flea beetles that love to feast on these brassicas. I use “snap clamps” to secure the fabric to the hoops. Make sure you get the right size snap clamp for the type of hoop you are using. The ones for EMT vs. PVC are not the same size. Keep this tunnel covered at all times except to harvest or weed to keep out the bugs.

Twice the tunnel, twice the protection, twice the work!

Spinach is tucked in under the security of a double tunnel.
The final tunnel I am using, the double tunnel, is by far the most difficult one to build and to manage, but it offers tremendous protection and advantages for your garden. This tunnel is not for the casual gardener as it requires daily maintenance to make sure the plants do not over-heat on sunny days, yet still stay warm on cool nights. These tunnels are fairly expensive at a cost of around $100. Double tunnels provide greenhouse-like conditions to extend your seasons to almost year-round gardening. Use them to grow salad crops throughout the winter or to get a jump-start for warm weather loving plants like squash, beans, and tomatoes.
Double tunnels consist of a low tunnel covered in Agribond 19 and a medium tunnel covered in 4 mil greenhouse film. The supports for the medium tunnel need to be made of EMT conduit to be able to support the load of a heavy snowfall. To make the frame, I use 10 foot sticks of 1/2 inch EMT conduit and bend them using a “Quick Hoops” bender. Heavy sandbags and snap clamps are used to hold the plastic down in high winds.
During the low-light days of December and January, these tunnels should remain closed to retain as much heat as possible. The other months of the year, the tunnels must be opened at one end or both ends during the day to keep the temperatures from getting too high inside and closed each night to retain heat.
These tunnels protected my salad crops through temperatures in the teens, but once we hit single digit and below zero temps, I lost most all of my greens. In a mild winter, I firmly believe that you can grow spinach, lettuce, carrots, and other salad crops just fine. In January, I re-planted two beds with spinach seeds, watered them in well, and covered with a double tunnel. It was a lot of work, but the results are looking great!

January seeded spinach doing very well under the double tunnels
Try a tunnel in your garden if you can. The results are very rewarding!
